12/1/23 – this post has been updated: https://blog.main.wattsdigital.com/camera-raw-16-0-adobe-finally-gets-it-right-with-video/
____________________________

Click once to embiggen & explore …
_____________________________
Well, gollie … as Gomer Pyle used to say, “surprise, surprise, surprise!“ … and, shazam – was he ever the prognosticator!
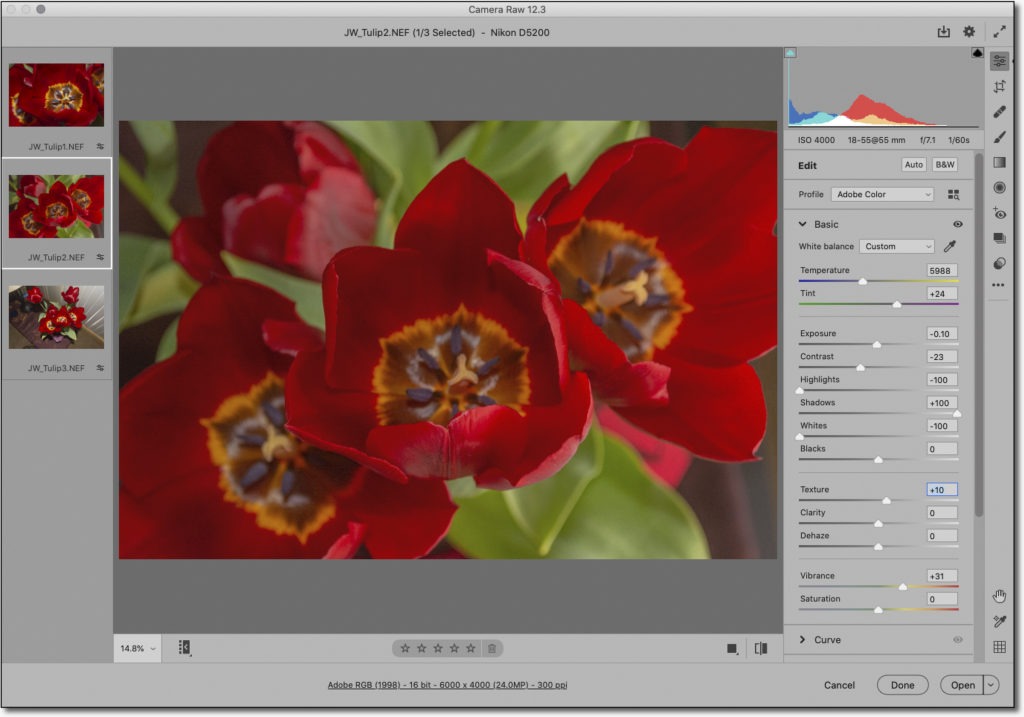
As you can see from the video & screen grab above (or if you’ve updated your CC apps in the last few days), Adobe has made radical changes to it’s Camera RAW plug-ins’ User Interface (UI) – – The new look is completely different.
I know, I know – change can be frustrating, and at first, I was indeed skeptical – but, this new UI is growing on me, and most definitely in a good way. The more I use it, the more I’m discovering that there are LOTS of little things that ultimately make this a more productive User Interface, compared to the old interface.
Also, if you’re one of my Photoshop students, here’s more good news: rest assured that these changes do NOT negate The Philosophy of Raw in any way – same functions & procedures, but with a different layout. With a wee bit of time & practice on your part, you’ll be up and running again in no time.
By the way, in the spirit of K.I.S.S. (Keep It Super Simple), I’m NOT covering any of the “gee-whiz” tools & functions (Selective Color Adjustment, Radial Filter, etc), because more than likely you’ll never need them. Besides, you can perform these functions in Photoshop with dramatically better results – – IF you follow the post-processing “Goals” of RAW to create a proper Master File.

Click once to embiggen & explore …
____________________________
New User Interface
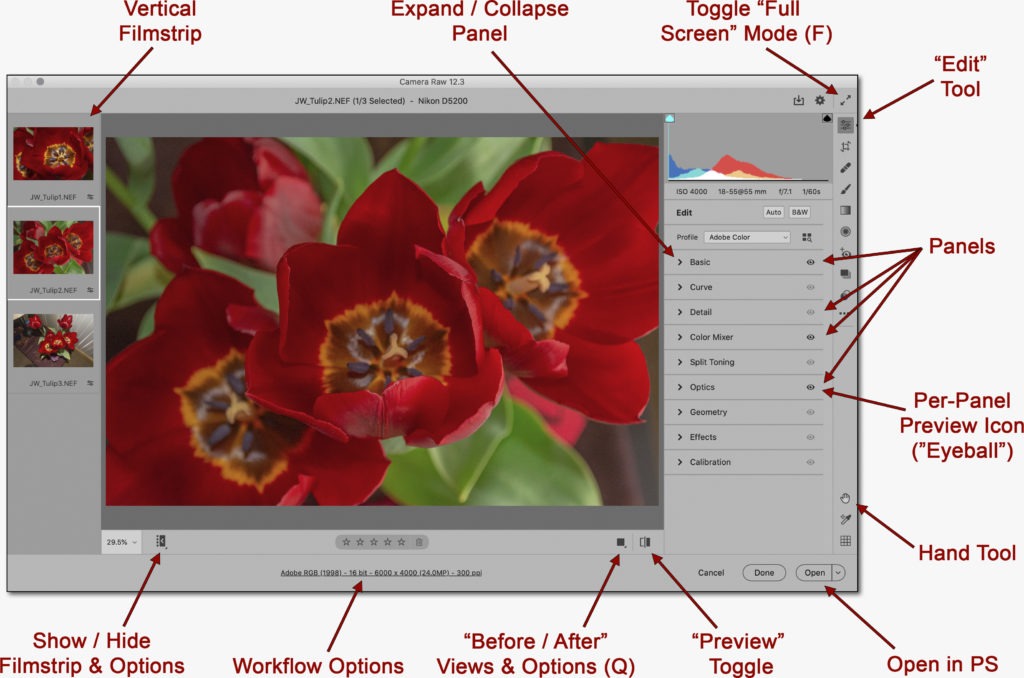
• The “Tools” have been moved from the top of the workspace to the right side. If you follow the Philosophy of RAW, you’ll only need one “Tool” – the “Edit” tool. To me, the other tools are “gee-whiz” functions (discussed above). Remember: K.I.S.S.!
• There aren’t any “Tabs“, as in the old interface. They’ve been replaced with “Panels” – and different “Panels” are available, depending on the “Tool” that’s been selected.
• Keep in mind that if you follow the Goals of RAW file enhancement, you will only need 1 “Tool” (the “Edit” tool), and 4 essential “Panels” (shown with arrows in the picture above). You can pretty much ignore the other “Tools” & “Panels” – – it’s “gee-whiz” stuff, and more than likely you’ll never need them.
• Here are 3 critical functions that have had their names changed:
1) “Tabs” are now “Panels” (IF the“Edit” tool is active)
2) The HSL “Tab” is now the Color Mixer “Panel”
3) The Lens Correction “Tab” is now the Optics ““Panel”
• Filmstrip: simply click the icon shown (in the video or screen grab above) to hide / reveal the Filmstrip – OR, click & hold for options. This is a handy feature if you’re processing multiple RAW files. I definitely don’t use it all of the time, preferring instead to see my image a bit larger in the Workspace.
New Features
• The Per-Panel Preview Icon (hereinafter referred to as the “Eyeball”): if a “Panel” is edited, then the Eyeball is highlighted – if it’s grayed out, there are no edits in that “Panel”. In the picture above, only 3 “Panels” have been edited.
• The Eyeball shows / hides the edits of the chosen “Panel” (it’s like the “Preview” toggle in the old RAW interface) – just click & hold to see “before”, and release to see “after”.
• Toggle to Default Settings (“Preview” Toggle): unlike the “Preview” toggle in the old interface, this shows before / after views of ALL corrections made to your RAW file – not just for an individual “Panel” – this is a big improvement!
• Color Mixer Panel options: this is just like the old HSL “Tab”, but with a slick addition. There’s now a drop-down menu called “Adjust”, which gives you the choice of either an “HSL” or “Color” mode. You’ll get the same results, regardless of which mode you choose. AND – if you make changes in one mode, those changes show up in the other mode.
If you choose “HSL” – – this works exactly like the old interface, with separate tabs for Hue, Saturation, & Luminance – with the eight colors in each tab. Think of it this way – choose which tab you need first (H, S or L), then adjust your particular color(s) within that tab.
If you choose “Color” – – the HSL controls are conveniently grouped together in whatever Color you’ve chosen. This is really handy if you only need to adjust the HSL of a particular color. Think of it this way – choose the Color first, then adjust the HSL for that Color only, all in one convenient place.
• Zoom Tool: this is definitely a major improvement from previous versions. Like the old interface, the Zoom Tool is the default cursor that shows up in your image. But now, if you click on your image, your image enlarges to 100% – – click again, and it returns to “Fit to View”.
Procedural
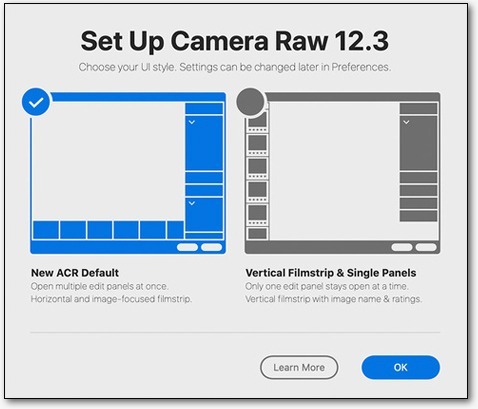
• Initial Splash Screen: this only shows up the first time you start the program. It’s a one time setup – it’s not permanent, and it’s easily changeable in the “Show / Hide Filmstrip Options” icon (shown in the video above, & screen grab below) .

• Settings: – If necessary, click on the “gear” icon in the upper right to access. But I’d recommend leaving everything at the default settings. If you need to change your “Workflow Options” (also available in the “Settings” menu), simply click on the area shown instead in the graphic above.
• Toggle Full Screen Mode: to avoid distractions in the background of your screen, click on the double-sided arrow icon in the upper right to expand – or use the Speed Key “F”.
• Click on the “Expand / Collapse Panel” icon (shown in the picture above) to open & close “Panels” – – If necessary, you can edit the “Panel” behavior in “Settings -> General”: I use the default “Single Panel” mode, as only one “Panel” is open at a time, and the others close – WAY less clutter!
• “Before / After” Views: press & hold for options / preferences, click for your preferred view – side-by-side, top / bottom, etc. FYI, the Speed Key is “Q”. By the way, I rarely use this function – but if you do, you can make adjustments to your file while in this view.
__________________________
Of course, this list is far from complete – but it’ll definitely get you up & working in no time – Remember, K.I.S.S.!
__________________________
Was this information helpful? Sign up for my free newsletter here …
Here’s info about my free live & online Photoshop Meetups:
https://wattsdigital.com/free-live-meetups-online
By the way, all of this is part of my Photoshop book designed for photographers, “Not just another Photoshop Book”, available exclusively on Amazon: https://www.amazon.com/dp/B07HNLS1Q2
Questions? Please contact me – also, feel free to comment and tell your photography friends!
Thx again, and cheers,
John Watts
