Updated 08/19/23- with Short YouTube Video:
PLEASE NOTE: Due to an abundance of requests (especially since I’m not a big proponent of Lightroom), I submit the following post for your consideration …
___________________
Amongst the vast majority of photographers, the 2 most popular programs used in selecting, culling & identifying those awesome images deserving of a Master File (created in Photoshop) are Bridge & Lightroom.
When it comes to digital post-processing, I’m a YUGE advocate of the K.I.S.S. (Keep It Super Simple) method – – life is complicated enough, don’t ya think?
So, I use Bridge exclusively (rather than Lightroom), mainly for its sheer simplicity. Even as a graphics professional, I don’t need (or want) the organizational power of Lightroom, nor the complexity & learning curve that comes with it.
• For more info on the “why”, I’ve written a series of 3 blogposts discussing in-depth the ongoing “Photoshop vs Lightroom” saga – at your convenience (and rather than repeat myself!), start by checking out Part 1, called “Photoshop vs Lightroom? Wrong Question!” (with links to Part 2 & 3): https://blog.main.wattsdigital.com/?p=1840
So, continuing on – – if you’re looking for SIMPLICITY in organizing & choosing those dynamite images destined for further work in Photoshop, read on …
What is “Bridge”?
Adobe Bridge is a stand-alone program that’s available with Photoshop CC and other Adobe Creative Cloud programs. It allows you to organize, browse, locate, label, rate, identify, choose and cull your image files.
In keeping with the spirit of K.I.S.S. (Keep It Super Simple), I’m going to cover the most useful features to a photographer. Because Bridge is such a relatively simple program, It’s quite possible that you’ll be proficient with Bridge in about an hour after studying this post!
Where to Find:
As Bridge is a separate standalone program, you can open it without opening Photoshop, just like any “normal” program – I have an icon for it in my Mac OS “Dock”. But if you want to – –
• From within Photoshop: Go to “File” -> “Browse in Bridge…”
• To open an image in Photoshop (or the Adobe Camera RAW plug-in, depending on the type of file it is), simply double-click on the images’ icon.

Bridge Preferences:
To access Preferences (Bridge must be open):
• Menu: “Adobe Bridge 2021” -> “Preferences…” on a Mac, and “Edit” -> “Preferences…” on a PC.
• Or Speed Keys: “Command + K” on a Mac, “Control + K” on a PC.
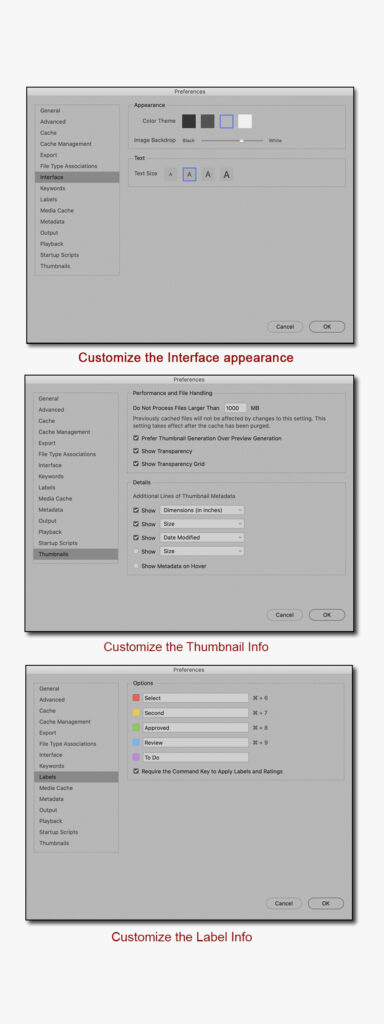
Most items are best left at the default value at first, but here are some suggested changes:
Click to “Interface”:
• Under “Appearance”, you can customize how your interface looks by choosing the background and accent colors., as well as the text size.
Click to “Thumbnails”:
• Choose up to 4 lines of information to appear under the image Thumbnails, such as Image Size, Color Profile, Dimensions, Bit Depth, Date Created, and more.
Click to “Labels”:
• You can customize your Label names as they appear in the “Filter” Panel.

An Explanation of Some of the Features:
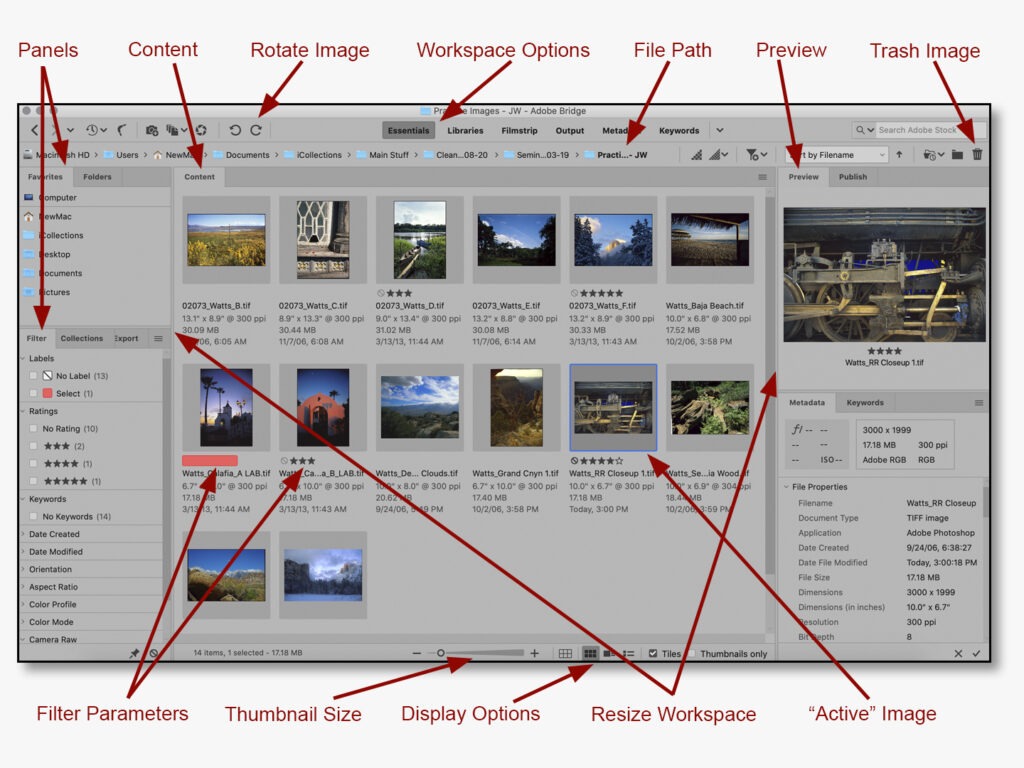
(see diagram above, mostly starting clockwise from upper-left)
• Panels: Each Panel gives you different information (just like the Panels in Photoshop). You can choose which Panels you want showing by going to the “Window” menu in Bridge. Those that are showing will have a checkmark beside them. Or, try the preset Workspaces (discussed below). In addition, you can save your Workspace the same way you do for Photoshop, discussed in my Photoshop Book, available on Amazon.
The view shown above is the “Essentials” Workspace. There are 10 Panels available, but I generally just use Favorites, Folders, Content, Preview, & Filter.
• Content Panel: Here you can view the content of your computer/folders. Right-click anywhere in this Panel to access the Sort sub-menu. Here you can change the way Bridge sorts your images. I have mine sorted in “Ascending Order” by “Filename”.
• Rotate Image: This gives you the ability to rotate the “Active” image (discussed below) 90 degrees either way.
• File Path: This shows the full “string” of the file path of the “Active” image (discussed below).
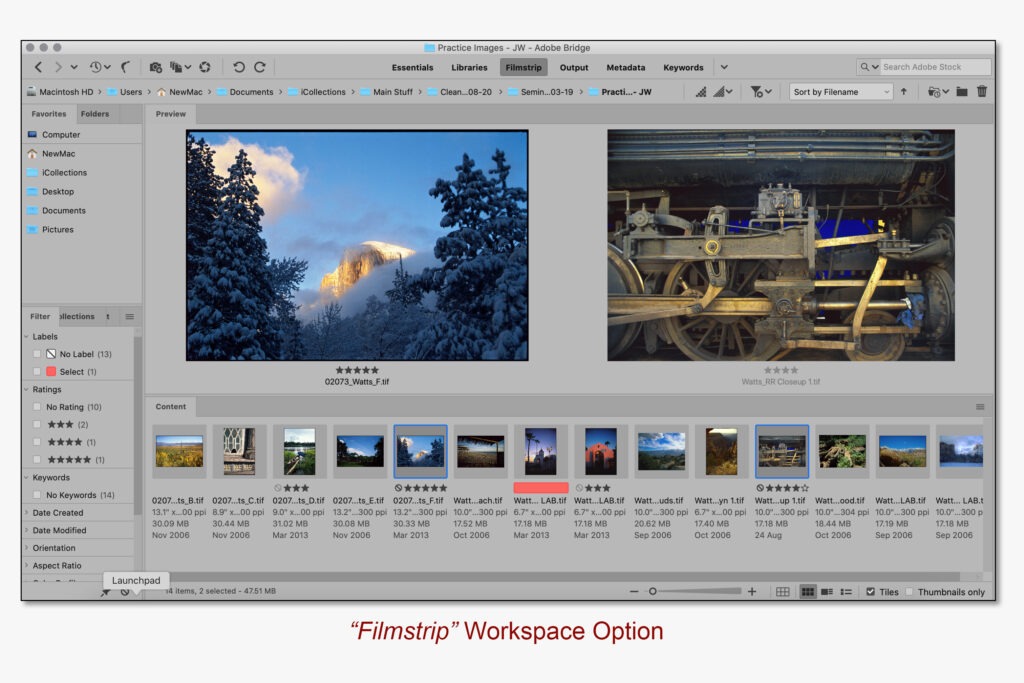
• Preview: This shows a preview of the “active” image (discussed below). By the way, if you choose more than one image to be active (“Shift or Ctrl/Command” + mouse click), more than one preview will show up (see diagram below).
• Trash Image: This gives you the ability to permanently trash the active image(s) as you’re editing, but I rarely use it.
• Filter Parameters / Labels: As you’re editing, this gives you a way to separate your good images from your great images. There are two parameters / labels that you can use to identify and separate your images:
1) Rate with Stars – You’ll notice 5 dots underneath the active image(s) – – by clicking on these, you can add or subtract “stars” to rate the active image. This is my favorite!
2) Rate with Colored Labels – By right-mouse clicking on the active image, you’ll see lots of options: to change the color of the label, choose “Label”.
By the way, by going to the “Label” menu in Bridge, you’ll see various speed keys to organize your editing quickly – I use these all the time, and they’re really easy to learn, which speeds up the editing process.
• Filter Panel: This is handy if you want to show ONLY those files that are labeled, filtered, etc.
• Thumbnail Size: Move this slider to change the Thumbnail Size in the “Content” Panel.
• Resize Workspace: By dragging these vertical dividers, you can change the size / view of the overall Workspace. Simply click on the area shown, hold the mouse button down, and drag.
• “Active” Image: The Active Image (or images) will be outlined in a different shade of gray than the other images – usually darker.
• “View Menu” options: Press the Space Bar on your keyboard to fill the image on your screen – click on your image, and it zooms in – press Space Bar again to exit. To see more options, go to the ”View” menu in Bridge.
• Workspace Options / Display Options: This is one of the most useful features of Bridge.
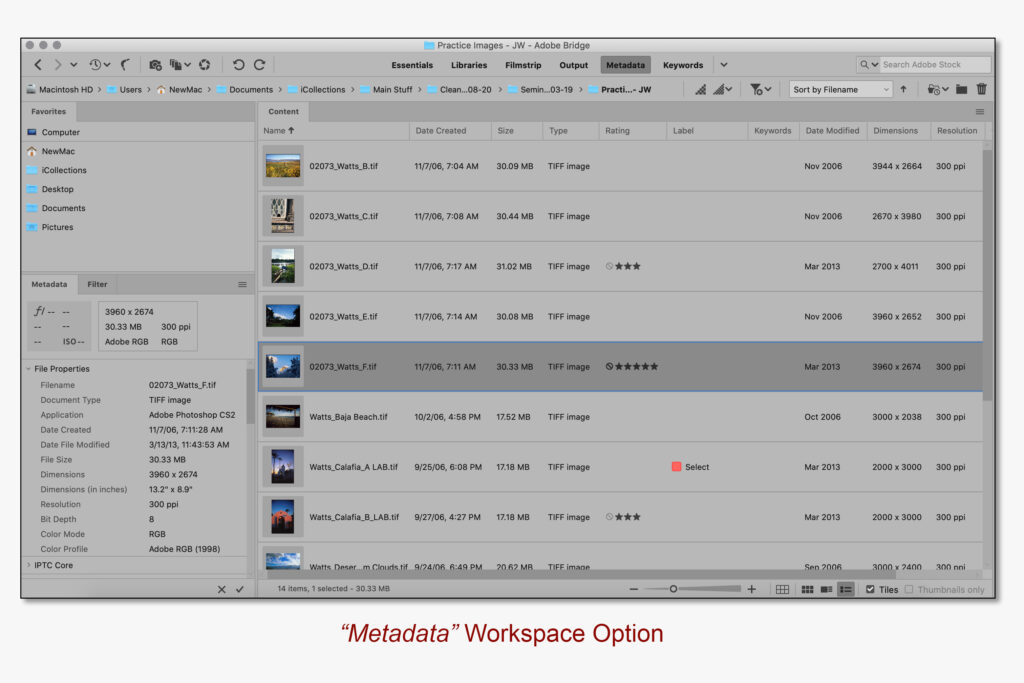
– By clicking on the Workspace Options buttons, and using the Display Options buttons at the bottom right, you can choose how you view, edit and preview your images. The example of Bridge above is the “Essentials” view – the examples below are the “Filmstrip” and “Metadata” views.
– By the way, if you use the “Filmstrip” view, it’s quite handy to use the “Arrow” keys on your keyboard to move from one image to another, and use the Label speed keys for editing (see the “Labels” menu in Bridge).


_____________________
• Want to see “Bridge” in action? AVAILABLE NATIONWIDE – for more on my free live & online Photoshop Meetups, click here:
https://wattsdigital.com/free-live-meetups-online
• More Photoshop videos at my YouTube Channel:
https://www.youtube.com/user/wattsdigitalvideos
• Was this information helpful?
Sign up for my free monthly newsletter here …
• By the way, this is all based on my Photoshop book designed for photographers, “Not just another Photoshop Book”, available as eBook (immediate PDF download) or paperback from Amazon:
https://wattsdigital.com/photoshop-book-e-book
Questions? Please contact me – also, feel free to comment and forward this to your photography friends!
Thx again, and cheers,
John Watts 🙂

Great information as always.
For a short while after I lost my Photoshop 7 due to a computer crash, I tried using Lightroom because it was less expensive to purchase. I had terrible problems with the program and the learning curve seemed awfully steep…
When I subscribed to Photoshop CC, I began using Adobe Bridge again and have had no problems.
I do a lot of my corrections in Camera RAW but, I am still in the process of relearning that program after Adobe changed the interface.
Thx for the compliments, Richard … A great personal story to what I was talking about in this post!
By the way, here’a link to a post I wrote (including a short video) on the new Camera RAW interface, which should save you a whole bunch of time: https://blog.main.wattsdigital.com/?p=3025
Cheers! JW 🙂